> ## Documentation Index
> Fetch the complete documentation index at: https://www.twicecommerce.com/docs/llms.txt
> Use this file to discover all available pages before exploring further.
# How to take an order in admin, from reservation to return
> Take an order over the counter or on the phone — creating it, putting a customer on it, adding what they take and for how long, collecting the money, handing it over, and closing it when it comes back.
 orders
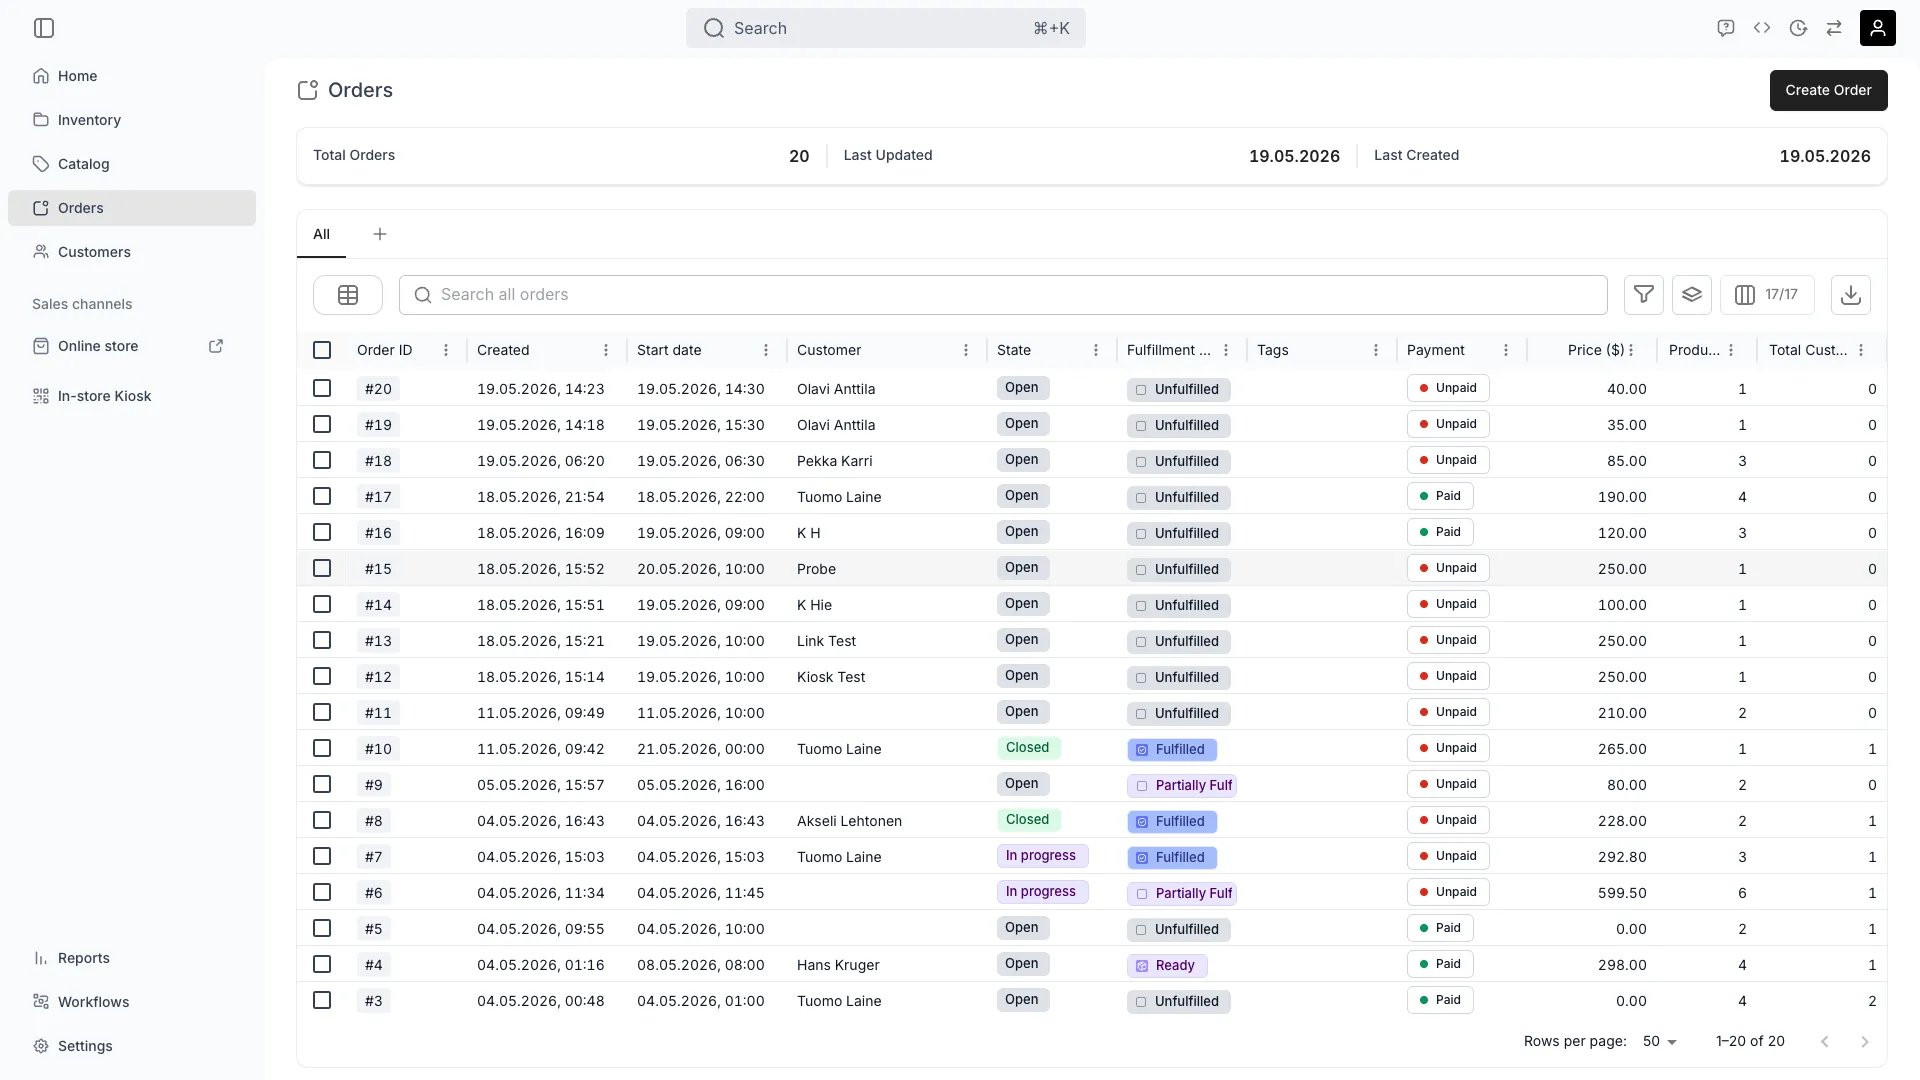
An order taken in admin is the same Order as one placed on the storefront. The difference is that you drive every step yourself rather than the customer doing it, which means nothing is filled in for you and nothing stops you leaving a step out.
One thing to know before you start: **the order exists the moment you press Create Order.** There is no draft form to fill in and submit. You get an empty, saved, Open order with a reference, and everything after that is editing it. An order you abandon halfway does not disappear — it sits in the table until you archive it.
This guide is the whole arc in the order the counter actually runs it: create, customer, items and dates, money, hand over, close.
## Prerequisites
**Required permissions:** `orders:order` in create and manage. All four system roles — Owner, Admin, Manager and Member — hold both. See [Users & Roles](/docs/settings/users-roles).
**Have ready before you start:**
* **A location selected** in the location picker. The **Create Order** button reads the locations you have selected, and does nothing at all when that selection is empty — see the pitfalls below.
* **The customer** — their name and email if you intend to send them a checkout link, or the record already in Customers.
* **What they are taking and when.** Availability is calculated for the dates you enter, so the dates come before the items, not after.
* **How they are paying** — a payment provider connected for checkout links, or a manual payment method configured for cash and card-at-the-counter. See [Payments](/docs/settings/payments).
## The Walkthrough
From **Orders**, press **Create Order** (the keyboard shortcut is `a`).
What happens next depends on how many locations you have selected:
* **One location selected** — the order is created there immediately and opens.
* **Several selected** — the button reads **Create Order...** and a **Select location** dialog asks which one first. Search by name or address.
The location you pick is the order's pickup location. It decides which stock the order can draw on and which fulfilment options apply, so it is worth getting right rather than correcting later.
You land on the order page with a reference, an **Open** status chip, and nothing on it.
Press **+ Add** and choose **Customer**, or work from the **Customers** tab.
The drawer searches your existing customers as you type. Pick one and press **Add selected**, or press **Create new customer** to make the record here without leaving the order.
An order can carry several customers — that is what a group order is — and the person paying is tracked separately as the billing contact, added with **Add billing contact**. For a straightforward counter sale one customer is both.
You can add items before the customer. But a checkout link needs an email address to go to, so if the customer is paying online, do this first.
Press **+ Add** and choose **Listing**. The **Add a listing** dialog opens.
**Set the dates at the top before you look at the table.** **Reserve from** and **To** drive the availability the table shows — change them afterwards and you are reading stock figures for the wrong period.
| Control | What it does |
| ------------------------- | ------------------------------------------------------------------------------------------------------------ |
| **Reserve from** / **To** | The period being reserved. For a listing with a fixed duration, **To** is derived and you only set the start |
| **Purchase option** | Narrows the table to **Booking** or **Sale**, or **All** |
| **Assign to customer** | Puts the line items straight onto one customer on the order |
| **Stock** | Available over total for those dates. A red dot means nothing is free |
| **Rate** | The pricing basis — a duration type, or **Sales** for a flat sale |
| **Qty to add** | How many units of that listing |
Press **Add** on a row, or tick several and press **Add selected**.
**Create new** opens the line item drawer instead, for something the catalog does not cover or a line you want to set by hand: **Name**, **Purchase option**, **Start** and **End** (a sale shows **Sales date** instead), **Unit price**, **Unit deposit** and **Manual discount**. Where the price differs from the catalog, the drawer shows the list price under the field with an **Apply list price** button to snap back to it.
You do not pick the physical units for a catalog listing, and the drawer will not offer them to you. Its stock section shows the listing's **fulfilment rules** instead — each rule's quantity, its label, and the conditions it matches on. The units are chosen against those rules.
Hand-picked stock items are for **custom items** only, which have no listing and therefore no rules to follow.
Once assigned, each item carries a fulfilment chip. Two of those chips are the same underlying state, rendered differently depending on the location's auto-assign setting:
* **Assigned** (blue) — auto-assign is on at this location. A unit is attached and can still be swapped.
* **Unassigned** (orange) — auto-assign is off. This is the normal resting state at such a location, not an error.
See [Auto-fulfillment](/docs/concepts/orders/auto-fulfillment) for which locations do which, and [control what stock a listing draws from](/docs/guides/catalog/listing-inventory-rules) if a rule is matching the wrong units or none.
The **Payment** button offers three ways, and which you use depends on where the customer is:
| Action | When |
| ---------------------- | ---------------------------------------------------------------------------------------------------------------------------------------------------------------------------- |
| **Send checkout link** | The customer pays themselves. Set **Amount to collect** and the recipient **Email**; the drawer shows **Order total**, **Paid** and **Unpaid** so you can collect part of it |
| **Manual payment** | Money already taken — cash, a terminal outside TWICE. Record **Amount to pay**, **Payment method** and optionally a back-dated **Payment date** |
| **Reserve deposit** | Hold a deposit against the order. Only offered when the line items carry one |
Selecting line items first scopes **Manual payment** to those lines rather than the whole order — useful when one person in a group pays for their own items.
Payment is tracked independently of status. You can hand items over unpaid and close an order unpaid; the order simply stays **Unpaid**.
Select the items and use **Mark as**, which offers the states in three groups: **Assigned** / **Reserved**, then **Ready** / **Excluded** / **On Hold**, then **Fulfilled** / **Returned**. With nothing selected the button acts on everything eligible; with a selection it counts what it will change.
**Ready** is for goods picked and waiting at the counter. **Fulfilled** is the handover itself.
The faster path for a whole order going out at once is to change the status chip from **Open** to **In progress**. That opens **Start this order**, and confirming it sets the status *and* marks every eligible item **Fulfilled** — skipping items that are on hold, excluded, returned, or already fulfilled.
Set the status chip to **Closed**. The **Close this order** dialog states what closing does — checkout links stop working, scheduled payment collections stop, and the order can no longer be edited, plus a line about subscriptions being cancelled when the order has any — and offers two **Optional actions**, both off by default:
* **Also mark booked items as Returned** — skips items on hold, excluded, or already returned.
* **Also mark eligible items as Fulfilled** — for anything handed over but never marked.
Tick what applies and press **Close order**. Closing is reversible: a closed order can be reopened back to **Open** or **In progress**.
## How do I know it worked?
The order is done when all three of its chips read the way the transaction actually went:
* **Status** is **Closed** — or **In progress** while the goods are still out.
* **Fulfillment state** is **Fulfilled**, and each returned unit reads **Returned** on the [Stock Items](/docs/orders/order-tabs/stock-items) tab. Returns do not move the order-level chip backwards, so **Fulfilled** is the correct end state for a completed order.
* **Payment** is **Paid**, or knowingly **Unpaid** with an invoice outstanding.
Beyond the chips: the units are free again for the dates after them, the order appears under the customer's own [Orders](/docs/customers/customer-tabs/orders) tab, and the [Activity Log](/docs/orders/order-tabs/activity-log) carries who did what.
## Troubleshooting / Common Pitfalls
**Cause:** no location is selected in the location picker. The button reads your selected locations to decide where to create the order — with one it creates immediately, with several it asks, and with none it has nowhere to put the order and silently does nothing.
**Solution:** select at least one location, then press it again. Nothing is wrong with the order or your permissions.
**Known defect, as of this writing.** The **Also mark eligible items as Fulfilled** checkbox on the **Start this order** dialog has no effect on the outcome. Starting an order always marks every eligible item **Fulfilled**, whether the box is ticked or cleared.
**What to do:** treat starting an order as "set In progress *and* fulfil everything eligible". If you want the status moved without the items being marked, change the chip to **In progress** on an order whose items are already in a state the fulfilment change skips — on hold, excluded, returned, or already fulfilled — or set the status first and correct the items afterwards with **Mark as**.
The equivalent checkboxes on **Close this order** do work, and are off by default.
**Cause:** nothing matching that listing is free for the dates in **Reserve from** and **To**. The **Stock** column shows the same thing — available over total, with a red dot at zero.
**Solution:** change the dates, or work out what is holding the units. [Work out what is available, and why something is not](/docs/guides/inventory/check-availability) covers the usual causes — an overlapping order, buffer time, a maintenance reservation, or stock at another location.
**Expected.** The dialog will not add a line it cannot price or reserve.
* **Select end date** — the listing has no fixed duration, so **To** cannot be derived and you must set it.
* **Select variants first** / **All variants must be selected** — the listing has variants and availability differs per combination. Expand the row and choose every one.
**Cause:** the listing is not bound to any stock. It can be added to an order and priced, but nothing physical will ever be assigned to it.
**Solution:** fix it on the listing, not on the order — see [control what stock a listing draws from](/docs/guides/catalog/listing-inventory-rules). This is the single most common reason a listing looks finished in the catalog and cannot actually be fulfilled.
**Usually expected.** **Unassigned** is how the resting state renders at a location with auto-assign switched off — the same state renders as a blue **Assigned** where it is on. The colour reads like a warning; at such a location it is not one.
**What to do:** assign units when you pick the order, or turn auto-assign on for the location. See [Auto-fulfillment](/docs/concepts/orders/auto-fulfillment).
**Cause:** it is closed, or archived. Closing makes an order read-only; archiving closes it first and then takes it out of the table.
**Solution:** reopen a closed order by setting its status back to **Open** or **In progress**. An archived order is read-only until it is unarchived from the banner on the order itself — its status chip will not respond until then. [Settings → Archived assets](/docs/settings/archived-assets) is where archived orders are reviewed and restored. Note that unarchiving does not revive the order's checkout links; issue a new one to collect again.
**Expected — the order was saved the moment you pressed the button.** There is no cancel that undoes creation.
**What to do:** archive it. Archiving an open order closes it first, which is why the confirmation asks you to acknowledge that. See [Archiving and Deletion](/docs/concepts/repeating-patterns/archiving-and-deletion).
## Next Steps
How status, payment and fulfilment move independently of each other.
Reading a live order at a glance.
When the rules assign the wrong units, or none.
When the dates you need come back empty.
orders
An order taken in admin is the same Order as one placed on the storefront. The difference is that you drive every step yourself rather than the customer doing it, which means nothing is filled in for you and nothing stops you leaving a step out.
One thing to know before you start: **the order exists the moment you press Create Order.** There is no draft form to fill in and submit. You get an empty, saved, Open order with a reference, and everything after that is editing it. An order you abandon halfway does not disappear — it sits in the table until you archive it.
This guide is the whole arc in the order the counter actually runs it: create, customer, items and dates, money, hand over, close.
## Prerequisites
**Required permissions:** `orders:order` in create and manage. All four system roles — Owner, Admin, Manager and Member — hold both. See [Users & Roles](/docs/settings/users-roles).
**Have ready before you start:**
* **A location selected** in the location picker. The **Create Order** button reads the locations you have selected, and does nothing at all when that selection is empty — see the pitfalls below.
* **The customer** — their name and email if you intend to send them a checkout link, or the record already in Customers.
* **What they are taking and when.** Availability is calculated for the dates you enter, so the dates come before the items, not after.
* **How they are paying** — a payment provider connected for checkout links, or a manual payment method configured for cash and card-at-the-counter. See [Payments](/docs/settings/payments).
## The Walkthrough
From **Orders**, press **Create Order** (the keyboard shortcut is `a`).
What happens next depends on how many locations you have selected:
* **One location selected** — the order is created there immediately and opens.
* **Several selected** — the button reads **Create Order...** and a **Select location** dialog asks which one first. Search by name or address.
The location you pick is the order's pickup location. It decides which stock the order can draw on and which fulfilment options apply, so it is worth getting right rather than correcting later.
You land on the order page with a reference, an **Open** status chip, and nothing on it.
Press **+ Add** and choose **Customer**, or work from the **Customers** tab.
The drawer searches your existing customers as you type. Pick one and press **Add selected**, or press **Create new customer** to make the record here without leaving the order.
An order can carry several customers — that is what a group order is — and the person paying is tracked separately as the billing contact, added with **Add billing contact**. For a straightforward counter sale one customer is both.
You can add items before the customer. But a checkout link needs an email address to go to, so if the customer is paying online, do this first.
Press **+ Add** and choose **Listing**. The **Add a listing** dialog opens.
**Set the dates at the top before you look at the table.** **Reserve from** and **To** drive the availability the table shows — change them afterwards and you are reading stock figures for the wrong period.
| Control | What it does |
| ------------------------- | ------------------------------------------------------------------------------------------------------------ |
| **Reserve from** / **To** | The period being reserved. For a listing with a fixed duration, **To** is derived and you only set the start |
| **Purchase option** | Narrows the table to **Booking** or **Sale**, or **All** |
| **Assign to customer** | Puts the line items straight onto one customer on the order |
| **Stock** | Available over total for those dates. A red dot means nothing is free |
| **Rate** | The pricing basis — a duration type, or **Sales** for a flat sale |
| **Qty to add** | How many units of that listing |
Press **Add** on a row, or tick several and press **Add selected**.
**Create new** opens the line item drawer instead, for something the catalog does not cover or a line you want to set by hand: **Name**, **Purchase option**, **Start** and **End** (a sale shows **Sales date** instead), **Unit price**, **Unit deposit** and **Manual discount**. Where the price differs from the catalog, the drawer shows the list price under the field with an **Apply list price** button to snap back to it.
You do not pick the physical units for a catalog listing, and the drawer will not offer them to you. Its stock section shows the listing's **fulfilment rules** instead — each rule's quantity, its label, and the conditions it matches on. The units are chosen against those rules.
Hand-picked stock items are for **custom items** only, which have no listing and therefore no rules to follow.
Once assigned, each item carries a fulfilment chip. Two of those chips are the same underlying state, rendered differently depending on the location's auto-assign setting:
* **Assigned** (blue) — auto-assign is on at this location. A unit is attached and can still be swapped.
* **Unassigned** (orange) — auto-assign is off. This is the normal resting state at such a location, not an error.
See [Auto-fulfillment](/docs/concepts/orders/auto-fulfillment) for which locations do which, and [control what stock a listing draws from](/docs/guides/catalog/listing-inventory-rules) if a rule is matching the wrong units or none.
The **Payment** button offers three ways, and which you use depends on where the customer is:
| Action | When |
| ---------------------- | ---------------------------------------------------------------------------------------------------------------------------------------------------------------------------- |
| **Send checkout link** | The customer pays themselves. Set **Amount to collect** and the recipient **Email**; the drawer shows **Order total**, **Paid** and **Unpaid** so you can collect part of it |
| **Manual payment** | Money already taken — cash, a terminal outside TWICE. Record **Amount to pay**, **Payment method** and optionally a back-dated **Payment date** |
| **Reserve deposit** | Hold a deposit against the order. Only offered when the line items carry one |
Selecting line items first scopes **Manual payment** to those lines rather than the whole order — useful when one person in a group pays for their own items.
Payment is tracked independently of status. You can hand items over unpaid and close an order unpaid; the order simply stays **Unpaid**.
Select the items and use **Mark as**, which offers the states in three groups: **Assigned** / **Reserved**, then **Ready** / **Excluded** / **On Hold**, then **Fulfilled** / **Returned**. With nothing selected the button acts on everything eligible; with a selection it counts what it will change.
**Ready** is for goods picked and waiting at the counter. **Fulfilled** is the handover itself.
The faster path for a whole order going out at once is to change the status chip from **Open** to **In progress**. That opens **Start this order**, and confirming it sets the status *and* marks every eligible item **Fulfilled** — skipping items that are on hold, excluded, returned, or already fulfilled.
Set the status chip to **Closed**. The **Close this order** dialog states what closing does — checkout links stop working, scheduled payment collections stop, and the order can no longer be edited, plus a line about subscriptions being cancelled when the order has any — and offers two **Optional actions**, both off by default:
* **Also mark booked items as Returned** — skips items on hold, excluded, or already returned.
* **Also mark eligible items as Fulfilled** — for anything handed over but never marked.
Tick what applies and press **Close order**. Closing is reversible: a closed order can be reopened back to **Open** or **In progress**.
## How do I know it worked?
The order is done when all three of its chips read the way the transaction actually went:
* **Status** is **Closed** — or **In progress** while the goods are still out.
* **Fulfillment state** is **Fulfilled**, and each returned unit reads **Returned** on the [Stock Items](/docs/orders/order-tabs/stock-items) tab. Returns do not move the order-level chip backwards, so **Fulfilled** is the correct end state for a completed order.
* **Payment** is **Paid**, or knowingly **Unpaid** with an invoice outstanding.
Beyond the chips: the units are free again for the dates after them, the order appears under the customer's own [Orders](/docs/customers/customer-tabs/orders) tab, and the [Activity Log](/docs/orders/order-tabs/activity-log) carries who did what.
## Troubleshooting / Common Pitfalls
**Cause:** no location is selected in the location picker. The button reads your selected locations to decide where to create the order — with one it creates immediately, with several it asks, and with none it has nowhere to put the order and silently does nothing.
**Solution:** select at least one location, then press it again. Nothing is wrong with the order or your permissions.
**Known defect, as of this writing.** The **Also mark eligible items as Fulfilled** checkbox on the **Start this order** dialog has no effect on the outcome. Starting an order always marks every eligible item **Fulfilled**, whether the box is ticked or cleared.
**What to do:** treat starting an order as "set In progress *and* fulfil everything eligible". If you want the status moved without the items being marked, change the chip to **In progress** on an order whose items are already in a state the fulfilment change skips — on hold, excluded, returned, or already fulfilled — or set the status first and correct the items afterwards with **Mark as**.
The equivalent checkboxes on **Close this order** do work, and are off by default.
**Cause:** nothing matching that listing is free for the dates in **Reserve from** and **To**. The **Stock** column shows the same thing — available over total, with a red dot at zero.
**Solution:** change the dates, or work out what is holding the units. [Work out what is available, and why something is not](/docs/guides/inventory/check-availability) covers the usual causes — an overlapping order, buffer time, a maintenance reservation, or stock at another location.
**Expected.** The dialog will not add a line it cannot price or reserve.
* **Select end date** — the listing has no fixed duration, so **To** cannot be derived and you must set it.
* **Select variants first** / **All variants must be selected** — the listing has variants and availability differs per combination. Expand the row and choose every one.
**Cause:** the listing is not bound to any stock. It can be added to an order and priced, but nothing physical will ever be assigned to it.
**Solution:** fix it on the listing, not on the order — see [control what stock a listing draws from](/docs/guides/catalog/listing-inventory-rules). This is the single most common reason a listing looks finished in the catalog and cannot actually be fulfilled.
**Usually expected.** **Unassigned** is how the resting state renders at a location with auto-assign switched off — the same state renders as a blue **Assigned** where it is on. The colour reads like a warning; at such a location it is not one.
**What to do:** assign units when you pick the order, or turn auto-assign on for the location. See [Auto-fulfillment](/docs/concepts/orders/auto-fulfillment).
**Cause:** it is closed, or archived. Closing makes an order read-only; archiving closes it first and then takes it out of the table.
**Solution:** reopen a closed order by setting its status back to **Open** or **In progress**. An archived order is read-only until it is unarchived from the banner on the order itself — its status chip will not respond until then. [Settings → Archived assets](/docs/settings/archived-assets) is where archived orders are reviewed and restored. Note that unarchiving does not revive the order's checkout links; issue a new one to collect again.
**Expected — the order was saved the moment you pressed the button.** There is no cancel that undoes creation.
**What to do:** archive it. Archiving an open order closes it first, which is why the confirmation asks you to acknowledge that. See [Archiving and Deletion](/docs/concepts/repeating-patterns/archiving-and-deletion).
## Next Steps
How status, payment and fulfilment move independently of each other.
Reading a live order at a glance.
When the rules assign the wrong units, or none.
When the dates you need come back empty.