> ## Documentation Index
> Fetch the complete documentation index at: https://www.twicecommerce.com/docs/llms.txt
> Use this file to discover all available pages before exploring further.
# How to register stock items and connect them to a SKU
> Register one or many stock items from the Stock Items view and link them to a SKU so they share one product definition.
 inventory/stock-items
Registering a stock item creates the inventory record that everything else hangs off — availability, orders, income and expenses, and lifecycle events. Connecting it to a [SKU](/docs/concepts/inventory/skus) at the same time means the shared product data is defined once and inherited by every item linked to it.
## Prerequisites
**Required permissions:** creating a stock item needs `inventory:stock_item_general:create`. Two fields in the dialog are gated separately — a quantity above 1 needs `inventory:stock_item_fulfilment:create`, and attributes need `inventory:stock_item_attributes:create`. Creating a SKU without leaving the dialog needs `inventory:sku_general:create`.
All four built-in system roles (Owner, Admin, Manager, Member) include these. A [custom role](/docs/settings/users-roles) may not — check with whoever manages your roles if the **Register Items** button does nothing.
**Before you start, decide:**
* **The item name** — the label you and your team will recognise in tables and orders.
* **The item codes** — whether TWICE generates them or you enter your own existing labels or barcodes.
* **The SKU** — which product definition these items belong to, or the name and code of a new one.
* **The entry location** — the [location](/docs/concepts/admin/locations) the items enter your inventory at.
## The Walkthrough
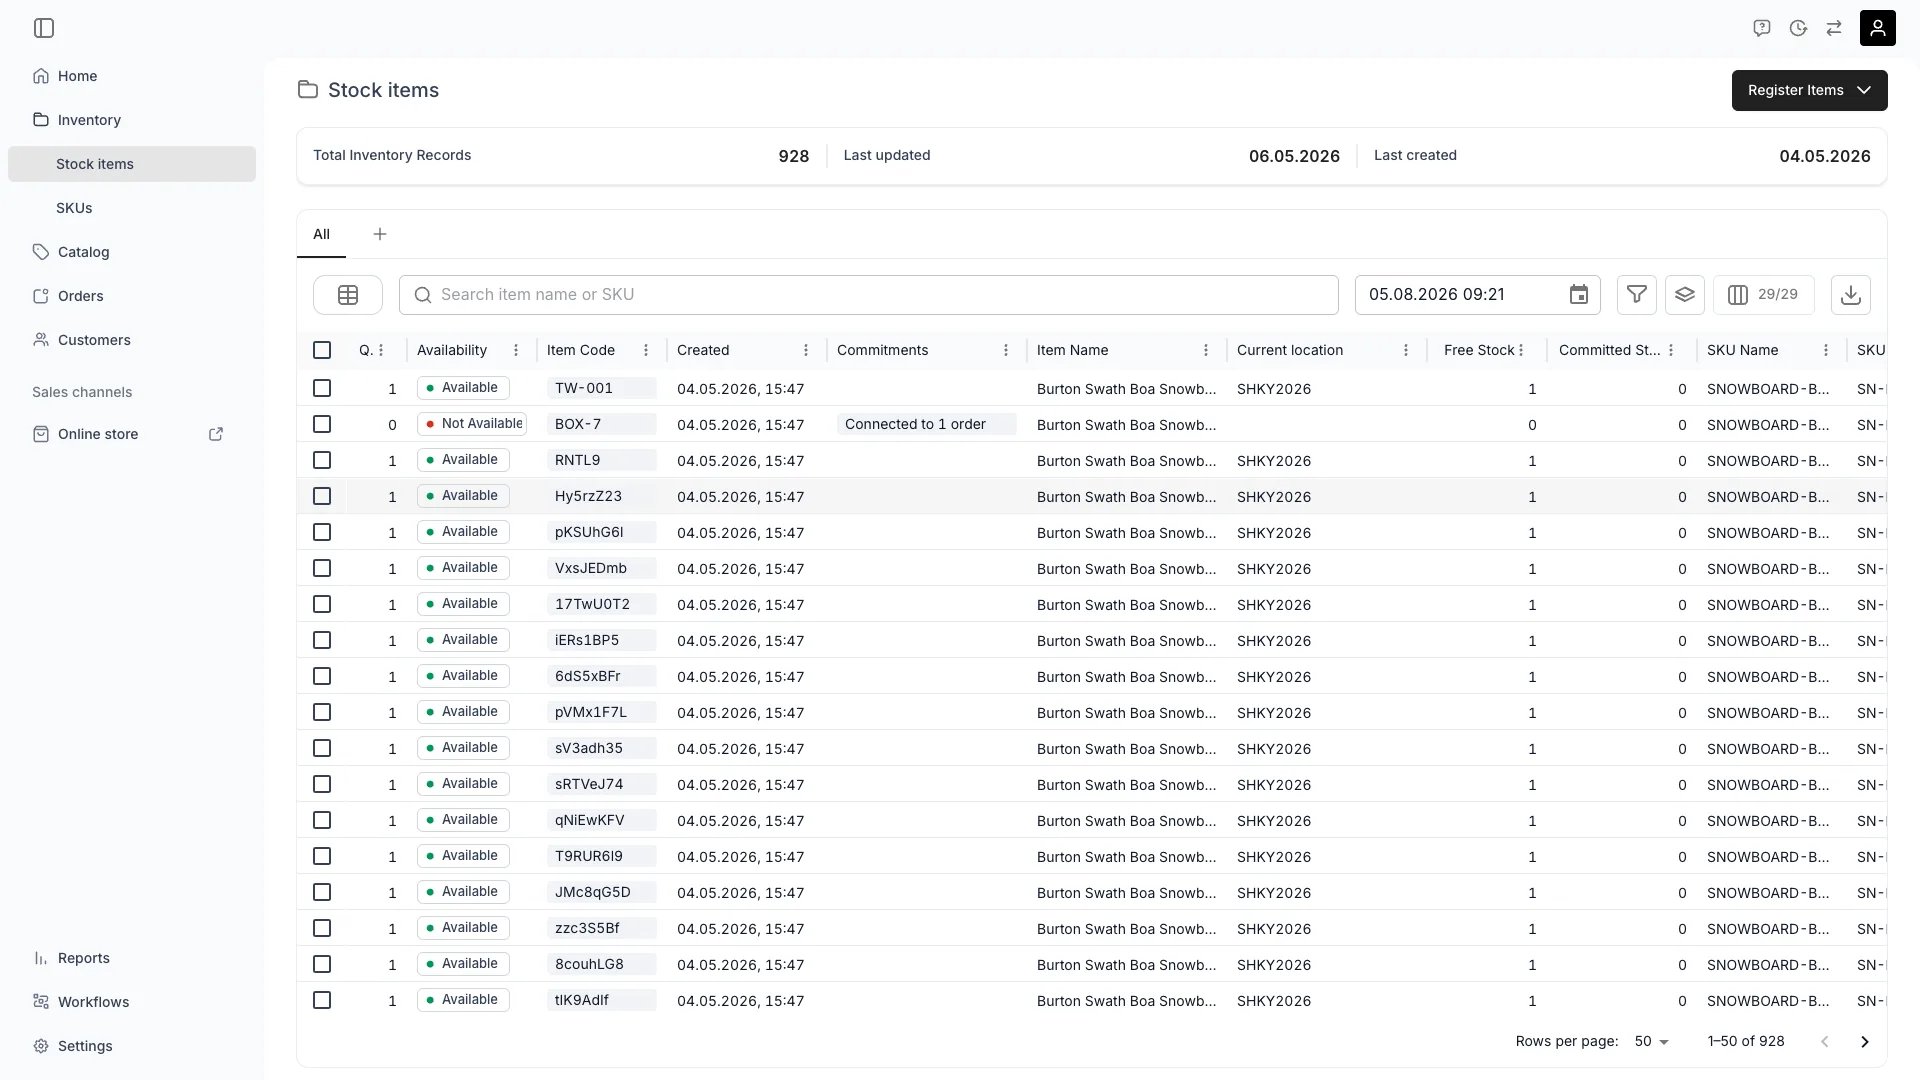
Select **Inventory > Stock items** in the sidebar.
Select **Register Items** in the top right, then **Manual Entry**. The **Register new stock item** dialog opens.
Two other entry points sit in the same menu: **Upload Images** creates items from photos in the file manager, and **Import CSV** registers items in bulk from a file.
In the item name field, search the names already in your inventory and pick one, or type a new name and add it. Reusing an existing name keeps identical items grouped consistently in tables and search.
Set **Item Codes** to **Auto-generate** or **Manual**.
* **Auto-generate** — TWICE assigns a unique eight-character code to each item, and the **Quantity** field appears.
* **Manual** — enter or scan your own codes. Codes are stored in uppercase, and you can paste several at once separated by commas, spaces, or line breaks. Codes that duplicate each other or an existing item are flagged, and the submit button stays disabled until you resolve them. With manual codes, the number of codes you enter is the number of items registered.
The dialog has two SKU fields, both reading **Search or create SKU**. The left one searches SKU names, the right one SKU codes, and both set the same SKU — filling one is enough.
Search for an existing SKU, or type a new name or code and select the add option to open the **Add new SKU** drawer. Give the SKU a name (required) and a code, save, and the new SKU is selected in the dialog.
Leaving both fields empty registers the items without a SKU. You can connect one later from the item's General tab.
**Track individually** is on by default. Together with **Quantity** it determines how many records you get:
| Quantity | Track individually | Result |
| -------- | ------------------ | -------------------------------------------------------------------- |
| 1 | On or off | One stock item |
| 5 | On | Five stock items, each with its own code, history, and costs |
| 5 | Off | One stock item with a stock balance of 5, pooled under a single code |
Track each item individually when you need per-item history — condition, repairs, income. Pool them when the units are interchangeable and only the count matters.
* **Entry Location** — the location the items are registered at.
* **Entry date** — when the items become part of your inventory. A future date means they are not available before it.
* **Entry status** — **Active** makes them available for operations, **Inactive** keeps them out until you change it.
Select **Register Stock Items**.
## How do I know it worked?
Where you land depends on how many records were created:
* **One item** — its stock item page opens on the **General** tab, with the item code and an **Active** chip in the header.
* **Several individually tracked items** — the **Editing multiple items** view opens. Anything you change there applies to every item you just registered. The items already exist at this point, so closing the view loses nothing.
Back in **Inventory > Stock items**, the new rows appear in the table, and **Total Inventory Records** and **Last created** in the header reflect the registration.
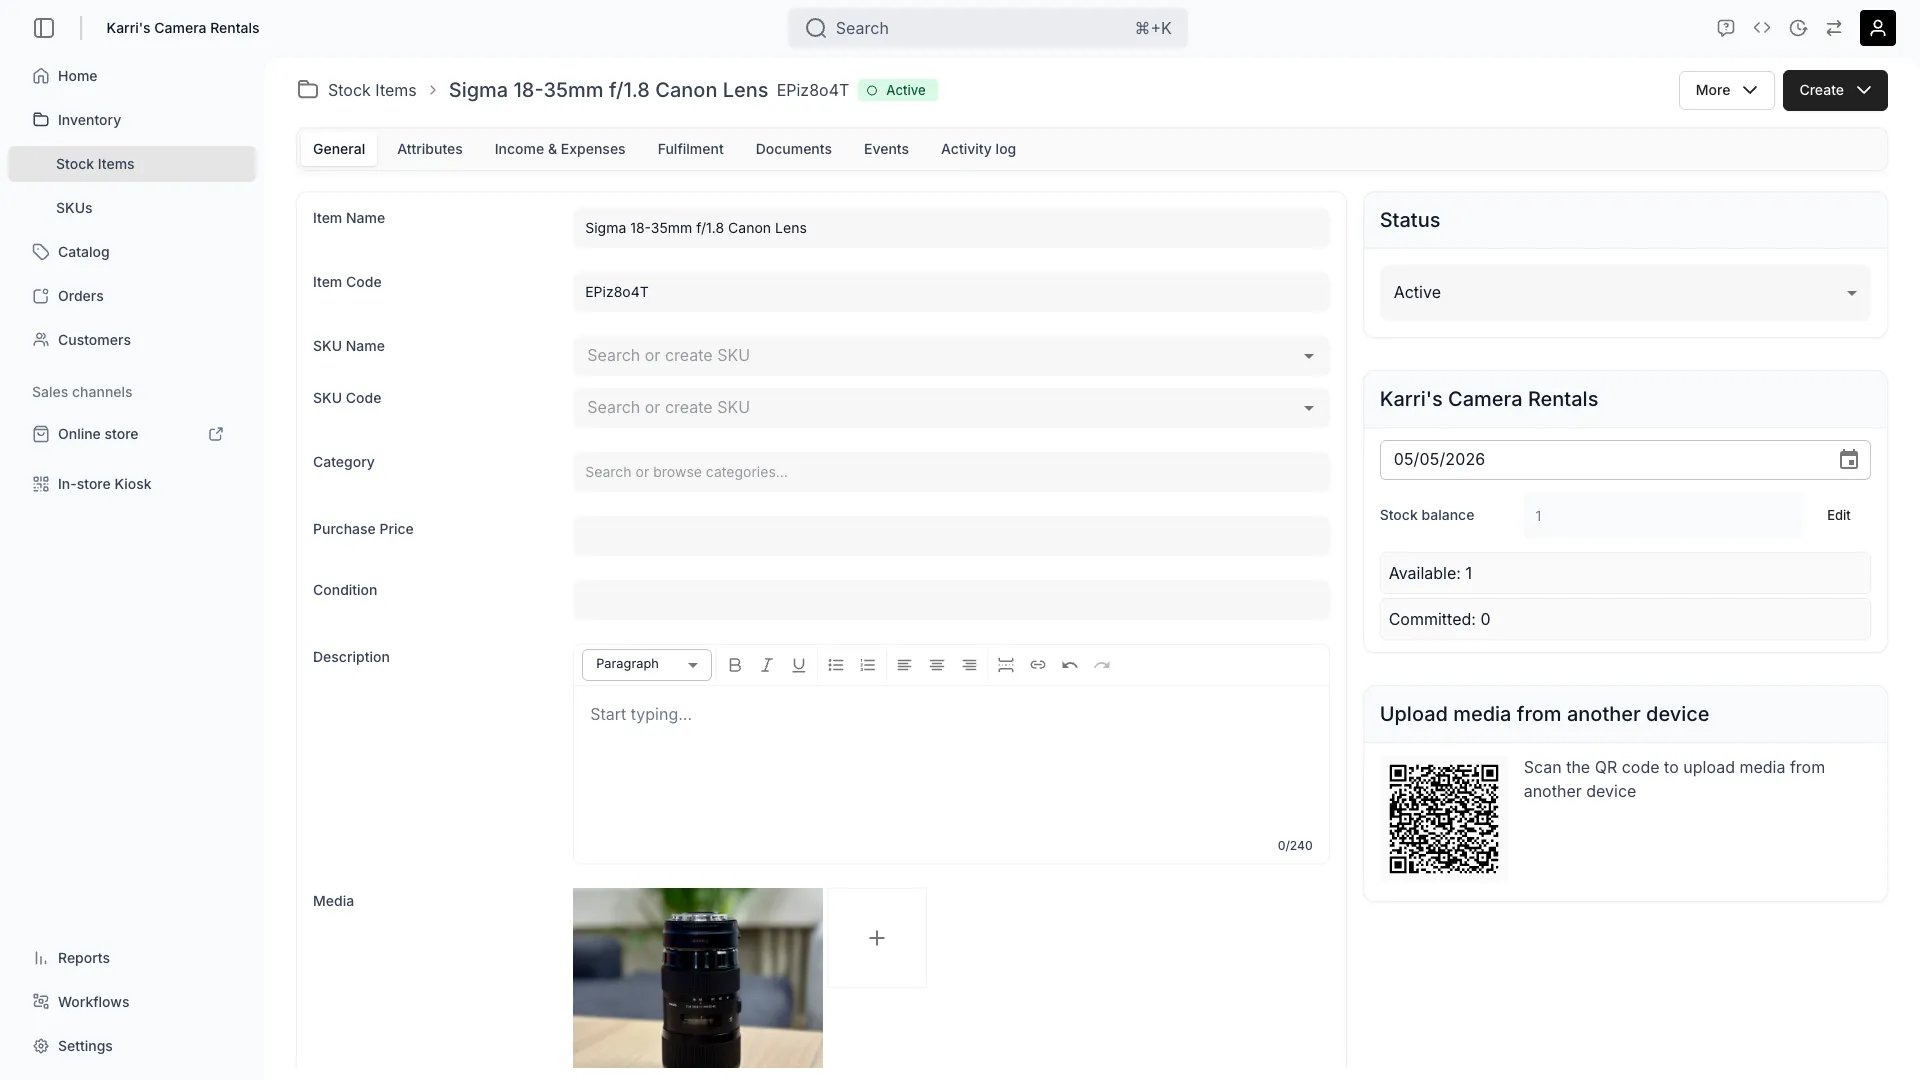
To confirm the SKU connection, open any of the new items. **SKU Name** and **SKU Code** on the General tab show the SKU, and the item is listed on that SKU's [Stock items tab](/docs/inventory/skus/stock-items).
inventory/stock-items
Registering a stock item creates the inventory record that everything else hangs off — availability, orders, income and expenses, and lifecycle events. Connecting it to a [SKU](/docs/concepts/inventory/skus) at the same time means the shared product data is defined once and inherited by every item linked to it.
## Prerequisites
**Required permissions:** creating a stock item needs `inventory:stock_item_general:create`. Two fields in the dialog are gated separately — a quantity above 1 needs `inventory:stock_item_fulfilment:create`, and attributes need `inventory:stock_item_attributes:create`. Creating a SKU without leaving the dialog needs `inventory:sku_general:create`.
All four built-in system roles (Owner, Admin, Manager, Member) include these. A [custom role](/docs/settings/users-roles) may not — check with whoever manages your roles if the **Register Items** button does nothing.
**Before you start, decide:**
* **The item name** — the label you and your team will recognise in tables and orders.
* **The item codes** — whether TWICE generates them or you enter your own existing labels or barcodes.
* **The SKU** — which product definition these items belong to, or the name and code of a new one.
* **The entry location** — the [location](/docs/concepts/admin/locations) the items enter your inventory at.
## The Walkthrough
Select **Inventory > Stock items** in the sidebar.
Select **Register Items** in the top right, then **Manual Entry**. The **Register new stock item** dialog opens.
Two other entry points sit in the same menu: **Upload Images** creates items from photos in the file manager, and **Import CSV** registers items in bulk from a file.
In the item name field, search the names already in your inventory and pick one, or type a new name and add it. Reusing an existing name keeps identical items grouped consistently in tables and search.
Set **Item Codes** to **Auto-generate** or **Manual**.
* **Auto-generate** — TWICE assigns a unique eight-character code to each item, and the **Quantity** field appears.
* **Manual** — enter or scan your own codes. Codes are stored in uppercase, and you can paste several at once separated by commas, spaces, or line breaks. Codes that duplicate each other or an existing item are flagged, and the submit button stays disabled until you resolve them. With manual codes, the number of codes you enter is the number of items registered.
The dialog has two SKU fields, both reading **Search or create SKU**. The left one searches SKU names, the right one SKU codes, and both set the same SKU — filling one is enough.
Search for an existing SKU, or type a new name or code and select the add option to open the **Add new SKU** drawer. Give the SKU a name (required) and a code, save, and the new SKU is selected in the dialog.
Leaving both fields empty registers the items without a SKU. You can connect one later from the item's General tab.
**Track individually** is on by default. Together with **Quantity** it determines how many records you get:
| Quantity | Track individually | Result |
| -------- | ------------------ | -------------------------------------------------------------------- |
| 1 | On or off | One stock item |
| 5 | On | Five stock items, each with its own code, history, and costs |
| 5 | Off | One stock item with a stock balance of 5, pooled under a single code |
Track each item individually when you need per-item history — condition, repairs, income. Pool them when the units are interchangeable and only the count matters.
* **Entry Location** — the location the items are registered at.
* **Entry date** — when the items become part of your inventory. A future date means they are not available before it.
* **Entry status** — **Active** makes them available for operations, **Inactive** keeps them out until you change it.
Select **Register Stock Items**.
## How do I know it worked?
Where you land depends on how many records were created:
* **One item** — its stock item page opens on the **General** tab, with the item code and an **Active** chip in the header.
* **Several individually tracked items** — the **Editing multiple items** view opens. Anything you change there applies to every item you just registered. The items already exist at this point, so closing the view loses nothing.
Back in **Inventory > Stock items**, the new rows appear in the table, and **Total Inventory Records** and **Last created** in the header reflect the registration.
To confirm the SKU connection, open any of the new items. **SKU Name** and **SKU Code** on the General tab show the SKU, and the item is listed on that SKU's [Stock items tab](/docs/inventory/skus/stock-items).
 ## Troubleshooting / Common Pitfalls
**Cause:** the form is incomplete or the codes are invalid.
**Solution:** an item name, an entry location, and an entry status are all required, and quantity must be at least 1. With **Manual** codes, at least one valid code is required and every flagged duplicate has to be removed.
**Cause:** item codes are unique across your merchant account, and the input also flags repeats within your own paste.
**Solution:** remove the flagged entries, or switch **Item Codes** to **Auto-generate** and add your own codes to the items afterwards.
**Cause:** **Track individually** was off, so the ten units were pooled into one record with a stock balance of 10.
**Solution:** if you need per-item history, register the items again with **Track individually** on and archive the pooled record.
Read more: [Inventory Tracking](/docs/concepts/inventory/inventory-tracking)
**When this happens:** the entry date is in the future, or the entry status is **Inactive**.
**What to do:** check both on the item's General tab. Availability is computed from the item's capacity minus anything overlapping it, so an item that has not entered inventory yet shows as unavailable until its entry date passes.
**Possible reasons:**
* The search runs against every SKU in your account, so a SKU that does not appear does not exist under that name or code.
* You are searching a name in the code field, or a code in the name field — the left SKU field matches names only, the right one codes only.
**Solution:** search the other field, or type the new name or code and create the SKU from the dialog.
**When this happens:** the bulk edit view is a one-hour session tied to the browser tab, so reloading or navigating away ends it.
**What to do:** nothing is lost — every item was created. Open them individually from the Stock Items table, or filter the table by **Created** to find the batch.
## Next Steps
Everything on the item's core tab — codes, SKU, category, status, and media.
Manage the product definitions your stock items inherit from.
Which data belongs on the item and which belongs on the SKU.
How serialized and pooled tracking differ, and when to use each.
## Troubleshooting / Common Pitfalls
**Cause:** the form is incomplete or the codes are invalid.
**Solution:** an item name, an entry location, and an entry status are all required, and quantity must be at least 1. With **Manual** codes, at least one valid code is required and every flagged duplicate has to be removed.
**Cause:** item codes are unique across your merchant account, and the input also flags repeats within your own paste.
**Solution:** remove the flagged entries, or switch **Item Codes** to **Auto-generate** and add your own codes to the items afterwards.
**Cause:** **Track individually** was off, so the ten units were pooled into one record with a stock balance of 10.
**Solution:** if you need per-item history, register the items again with **Track individually** on and archive the pooled record.
Read more: [Inventory Tracking](/docs/concepts/inventory/inventory-tracking)
**When this happens:** the entry date is in the future, or the entry status is **Inactive**.
**What to do:** check both on the item's General tab. Availability is computed from the item's capacity minus anything overlapping it, so an item that has not entered inventory yet shows as unavailable until its entry date passes.
**Possible reasons:**
* The search runs against every SKU in your account, so a SKU that does not appear does not exist under that name or code.
* You are searching a name in the code field, or a code in the name field — the left SKU field matches names only, the right one codes only.
**Solution:** search the other field, or type the new name or code and create the SKU from the dialog.
**When this happens:** the bulk edit view is a one-hour session tied to the browser tab, so reloading or navigating away ends it.
**What to do:** nothing is lost — every item was created. Open them individually from the Stock Items table, or filter the table by **Created** to find the batch.
## Next Steps
Everything on the item's core tab — codes, SKU, category, status, and media.
Manage the product definitions your stock items inherit from.
Which data belongs on the item and which belongs on the SKU.
How serialized and pooled tracking differ, and when to use each.